I get super irritated when I navigate to a document library or list in SharePoint and then have to click “Next 30, next 30” until I get to the information I’m looking for. Sadly people end up hating SharePoint for this, but they are actually in control of managing / changing this.
| Day: | 9 of 365, 356 left |
| Tools: | SharePoint 2013; SharePoint Online |
| Description: | How to change the item limit in SharePoint views |
Every SharePoint view has an item limit (as well as a group limit). This can be changed by modifying the current view or creating a new view (I never edit the DEFAULT view that the list or library came with – I always create myself a new copy).
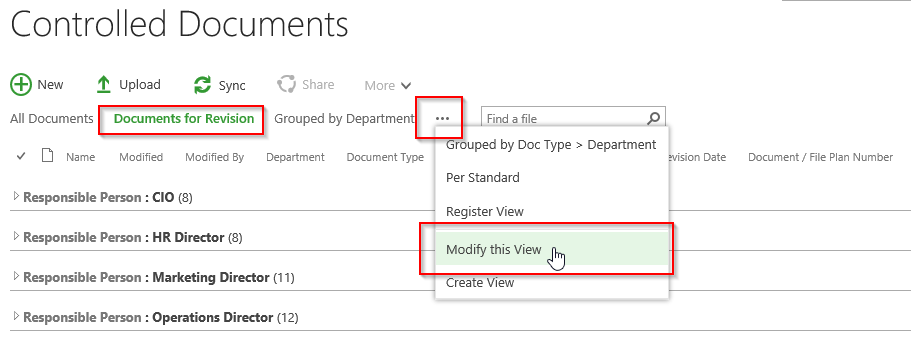
In this post I will show you how to modify your existing view: Ensure you are on the correct view, click on the ellipses next to the view names, and click on “Modify View”.
Scroll down to the settings for Group By (if you are using groupings) and change the limit:

If you scroll down further you will see the “Item Limit”. The default is normally set to 30, you can change this to at least 100 / 150 depending on how fast the page will load (respond). In other words – if the page takes too long to load after you’ve made the changes, make the limit smaller. More items will take longer to load. Careful of accidentally modifying the mobile view below that, I normally leave this as default.
And that’s me for today!
Overview of my challenge: As an absolute lover of all things Microsoft, I’ve decided to undertake the challenge, of writing a blog every single day, for the next 365 days. Crazy, I know. And I’ll try my best, but if I cannot find something good to say about Office 365 and the Tools it includes for 365 days, I’m changing my profession. So let’s write this epic tale of “Around the Office in 365 Days”. My ode to Microsoft Office 365.
Keep in mind that these tips and tricks do not just apply to Office 365 – but to the overall Microsoft Office Suite as well as SharePoint.


1 Pingback