 Wiki Pages are an amazing functionality in SharePoint which allows normal contributors (they don’t even need full control) to create HTML pages, add content and web parts and build navigation which is not reliant on the site structure.
Wikiwiki means quick in Hawaiian. A wiki library is a document library in which users can easily edit any page. The library grows organically by linking existing pages together or by creating links to new pages. If a user finds a link to an uncreated page, he or she can follow the link and create the page.
In business environments, a wiki library provides a low-maintenance way to record knowledge. Information that is usually traded in e-mail messages, gleaned from hallway conversations, or written on paper can instead be recorded in a wiki library, in context with similar knowledge. (Microsoft Definition)

For this blog I’m going to use wiki pages to build the Project Management Office Process. As I might want to add other procedures to this library, the app (Wiki Page Library) will be called Procedures.
Creating the new Wiki Page Library:
Site Settings > Add a new app > Wiki Page Library. The library will open with a Home Page, put the page into Edit mode, click on the Page Tab > Rename Page. I’ve renamed it to “Procedures Index”. As wiki pages can be created from any existing page, it’s important to have an index page, which allows you to have an overview of all the pages you’ve created. I always use the Home page of the wiki page library as the Index page. This page will not be shared with users in general, but rather be used for administration purposes. Why do I rename the page? A lot of users get confused with the name HOME as they think it’s the site’s Home page. Renaming it minimizes the confusion when referencing the existing Wiki Pages on other pages.
On this page you can plan all the pages you wish to build, which will in turn ensure smooth navigation between your pages, because you will know ‘where you’re going’. I’ve inserted a table (5×5) on this page to plan the pages and their flow into each other.
Creating New Wiki Pages:
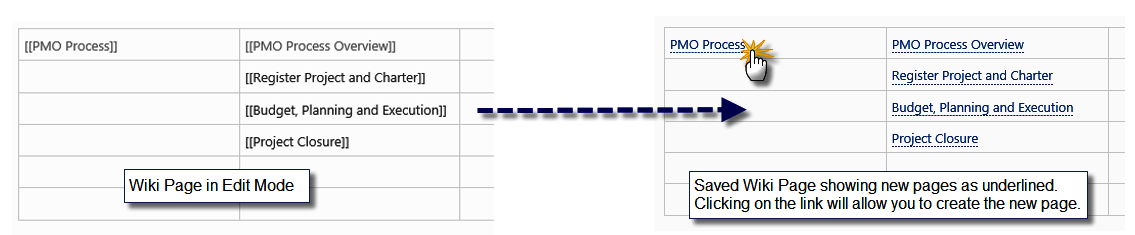
Note that I use [[ ]] – 2 square brackets at the start and end of each new page name. Once you’ve listed all the pages you want to create, save the index page. The non existing pages will be underlined, you can now click on them to create the new pages. Always create pages from this page, or you will lose the overview of how your pages are supposed to fit together. Imagine buying a new book which has no index and all the pages are just thrown (loose) into a box – no order or relation to each other. Jip – that’s how fast Collaboration can turn into Chaos.

Formatting and adding content to Wiki Pages:
Once you’ve clicked and confirmed the new page you would like to create, SharePoint will open the page in edit mode. If you want to create pages that looks like DOS with no form or fashion – then don’t bother using the Text layout or inserting tables. HAHA Just kidding – no one wants that!! I prefer using tables to separate images and align text as the table layout settings allows for setting the size etc. of the ‘zones’.
The ribbons (menus) in SharePoint are very similar to that which you would find in the Microsoft Office Products – because of course, SharePoint is Microsoft. So you’ll feel right at home here. Below you’ll find an overview:
1. Page Tab:
Edit > Save & Check Out
Manage > Rename Page : Used to rename pages
Page Actions > Incoming Links : Used to find other pages that reference the page you are on
Page Library > View All Pages : This is where I look at the ‘library view’ of the pages library
2. Format Text Tab:
Clipboard > Copy, paste, cut and Undo
Font, Paragraph, Style & Spelling : Similar to Word – used for formatting of text
Layout > Text Layout : Used to define zones on your page
Markup > All the coding stuff
3. Insert Tab:
Tables, Media, Links, Parts and Embed is used to add various items to your page
4. Image Tab:
Select, Properties, Styles, Arrange, Size & Spacing : These are only available once you’ve added images to your page
5. Table Layout:
Merge, Rows & Columns, Width & Height, Properties : Only available once you’ve added a table to your page
6. Design Tab:
Table Style Options, Table Styles & Table : Only available once you’ve added a table to your page
Note: Design Tab > Styles > Clear allows you to “hide” the lines of your table.


Building a ‘breadcrumb’ at the top of your pages:
I always build these for quick navigation. Just as you used the square brackets [[ ]] to create new pages, you will also use them to reference pages already existing in the current Wiki page library. As you start typing text after the square brackets, SharePoint will open a dropdown displaying existing pages which start with those letters. Enter on the page name you want to use. Ensure that it closes with the square brackets as well, or you’ll have to enter them manually.
I use the vertical bar (pipe character) in-between the page names so it will display better. For example: [[Existing Page Name 1]] | [[Existing Page Name 2]] etc.
IMPORTANT: Should you ever delete a wiki page – any reference you’ve made to it on other pages will display as an underlined link again (new page to create). So before deleting a page, go to the Page Tab (not in edit mode) > Page Actions > Incoming Links. SharePoint will now display any other pages which references the page you are about to delete. It will only search in the current site and in sub sites. Make a note to remove those links on those pages as well. SharePoint will not automatically remove it.


PMO Process: On this page I didn’t change the text layout or insert any tables. I pasted the content from Word and applied some formatting to it.
Note: Formatting is sometimes ‘inherited’ when copied from other sources. This could cause endless headaches. I’ve learnt to deal with this by copying the text to Notepad first. This strips (all) formatting before taking it across to the Wiki Page. So keep in mind that bullets, numbers and indents are also gone. (Thanks for reminding me Bil Simser).

PMO Process Overview: For this page I created images (shapes) in PowerPoint, added text to it. I then right-clicked on the objects and saved them as images. On the SharePoint page I inserted a 3 x 5 table and inserted the images in the table. I then cleared the table lines under Designs Tab > Styles > Clear. On the second image I show the gridlines to illustrate this. Have a look at two of my previous blogs regarding The lighter side of Microsoft #3: Banners & Click-able Images In SharePoint and The lighter side of Microsoft #5: Be more creative with Microsoft Office for some more tips and tricks.


Register Project & Charter: Here I inserted a 2 x 1 table. On the left I inserted an image that I created in PowerPoint and on the right I pasted the text from Word. After I did some formatting on it, I highlighted some of the words and inserted hyperlinks to existing documents on my SharePoint site on them. I consider it bad practice to insert documents on a wiki page, uploading them to an existing document library and hyperlinking to them works better as I can always find all my documents in one place. See my blog The lighter side of Microsoft #10: Mailto e-mail links which explains hyperlinks on images and text on Wiki Pages in more detail.

Budget, Planning & Execution: Same as the previous page, I inserted a 2 x 1 table, image on the right, text on the left. Budget is hyperlinked to a template in a document library and on the email I’ve inserted a mailto link. See the above referenced blogs on how to do this.

Project Closure: For this page I inserted a 3 x 2 table, and merged some of the cells to get the alignment right. See the second image to illustrate. On the email icon I inserted a mailto link.


I hope you’ve enjoyed the blog and suddenly see many opportunities to improve your SharePoint environment. For more information regarding Wiki Pages, see SharePoint pages II: Work with wiki pages and SharePoint pages II: Work with wiki pages – Quick Reference Card.

March 4, 2015 at 2:48 pm
Love your site. Can you kindly clarify that ‘to create a breadcrumb’, you’ve demonstrated how to do this manually (on each page)?
March 4, 2015 at 5:01 pm
Hi there. Thanks! This is indeed manual and needs to be done on each page. If two pages are open and in edit mode at the same time you can copy and paste it from one to another. Using the [[ will open up a list of already existing wiki pages and you can just enter on them to add them. If you want to add other pages or links in your ‘breadcrumb’ that doesn’t exist in the wiki library, you’ll have to type the name, then highlight it and insert a hyperlink on it. So this breadcrumb is just a horizontal list of links at the top of your page for navigation and is not the same as the original, automatically generated breadcrumb on precious versions of SP. Hope this helps? If not – just shout and I’ll gladly help further.
March 4, 2015 at 5:05 pm
Your a star. Thank you.
March 4, 2015 at 5:05 pm
You are ever so welcome!