#Office365Challenge – Column settings and validations in SharePoint are as important as the columns you add and the app you’re building. The more validations are set, the better the captured data will be. In the end, the purpose of any solution is the output right?
| Day: | 91 of 365, 274 left |
| Tools: | SharePoint |
| Description: | Column Settings and Validations in SharePoint |
If this is the first time you visit my blog, you might have missed a lot about building apps and adding columns. Let’s recap the basics: Columns contain metadata which are properties related to the item. Think of a contact list in Excel. Columns would be Name, Surname, Telephone number etc. These are the same as columns in SharePoint.
To add Columns, you’ll go to the Library Tab > Library Settings:

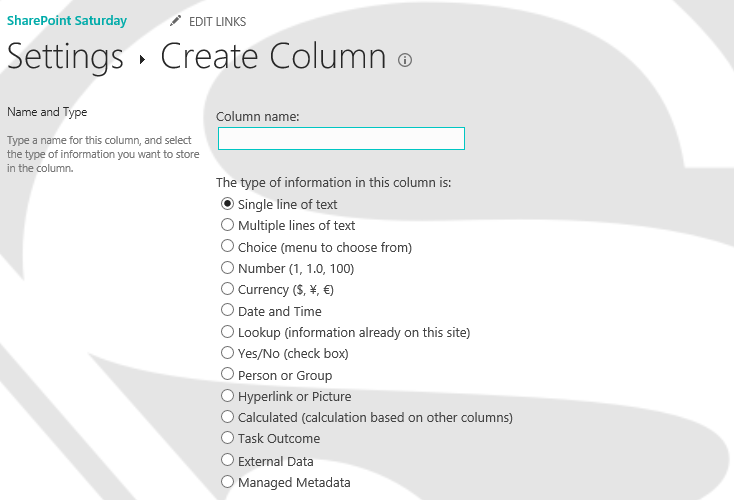
Under the default columns added, you’ll see “Create Column”, click on this:

These are the columns you can add in SharePoint, on lists and libraries (Surveys have an extra column – Rating Scale):

Single Line of Text:
Description – add a description which users will see on the form
Compulsory – should they be forced to fill it in
Enforce Unique Values – do you only allow a value to be completed once
Maximum No of Characters – limit the length
Default Value – these can be added to guide users on input
Add to Default View – should this column show on the default view of the list / library
Multiple lines of text:
Description
Compulsory
Number of Lines for Editing
Specify type of Text
-Plain
-Rich Text
-Enhanced
Append Changes (based on above)
Add to Default View
Choice (menu to choose from):
Description
Compulsory
Enforce Unique Values
Type each Choice
Display as
-Dropdown Menu (use for more than 3 choices – based on requirement)
-Radio Buttons (3 choices or less)
-Checkboxes (multiple values can be selected)
Allow Fill-in Choices (are they allowed to enter other text but the choices provided?)
Add to Default View
Number (1, 1.0, 100):
Description
Compulsory
Enforce Unique Values
Specify Minimum and Maximum Value (limit input)
Number of Decimal Places
Default Value
-Number
-Calculated Value
Show as a Percentage
Add to Default View
Currency ($, ¥, €):
Description
Compulsory
Enforce Unique Values
Specify Minimum and Maximum Value
Number of Decimal Places
Default Value
-Currency
-Calculated Value
Currency Format
Add to Default View
Date and Time:
Description
Compulsory
Enforce Unique Values
Date and Time Format
-Date Only
-Date and Time
Display Format
-Standard (29/05/2016)
-Friendly (29 May 2016)
Default Value
-None
-Today’s Date
-Custom
-Calculated Value
Add to Default View
Lookup (information already on this site):
Description
Compulsory
Enforce Unique Values
Get Information From (Dropdown to lists on current site)
In this Column (Based on above list chosen)
Add Additional Columns (Return more columns based on above list chosen)
Add to Default View
Enforce relationship behaviour (between two apps)
Yes/No (check box):
Description
Default Value
-Yes
-No
Add to Default View
Note: I’m not too fond of these – as they have a default value of either yes/no, which means the user can skip it and not change the value. In that case I would rather use a choice with yes and no as choices.
Person or Group:
Description
Compulsory
Enforce Unique Values
Allow Multiple Selections
Allow Selection of
-People Only
-People and Groups
Choose From
-All Users
-SharePoint Group
Show Field (you can display the field as one of the AD Properties for example email address / number)
Add to Default View
Hyperlink or Picture:
Description
Compulsory
Format URL as
-Hyperlink
-Picture (if URL to image it will display the image not the URL)
Add to Default View
Calculated (calculation based on other columns):
Description
Formula (choose fields to build formula with)
Return Data as
-Single Line of Text
-Number
-Currency
-Date and Time
-Yes / No
Add to Default View
Task Outcome:
Description
Compulsory
Enforce Unique Values
Type Each Choice
Default Value
Note: Similar to a choice field, used for status / task outcome
External Data:
Description
Compulsory
External Content Type (lookup)
Select Field to be Shown (lookup)
Display the actions menu Yes/No
Link this column to the Default Action of the External Content Type Yes/No
Add to Default View
Managed Metadata:
Description
Compulsory
Enforce Unique Values
Add to Default View
Allow Multiple Values yes/no
Display Value
-Term Label in the Field
-Entire Path to Term in the Field
Use Managed Term Set (lookup, remember to select the level where it should expand for the user)
Customise Term Set
Allow for Fill-in Choices
Default Value
Tomorrow we’ll look at reusable content – lookups, choices, term store.
Overview of my challenge: As an absolute lover of all things Microsoft, I’ve decided to undertake the challenge, of writing a blog every single day, for the next 365 days. Crazy, I know. And I’ll try my best, but if I cannot find something good to say about Office 365 and the Tools it includes for 365 days, I’m changing my profession. So let’s write this epic tale of “Around the Office in 365 Days”. My ode to Microsoft Office 365.
Keep in mind that these tips and tricks do not only apply to Office 365 – but where applicable, to the overall Microsoft Office Suite and SharePoint.

1 Pingback