#Office365Challenge – Reusable Metadata in SharePoint – Lookups (not the same as reusable content as known in the SharePoint world). So what I mean by this (cause yes it’s my personal reference), is categories to reuse as metadata. There are different options when it comes to this, from not optimal to best: Single Line of Text > Choice Columns > Lookups > Site Columns > Term Store (managed metadata). In this post we’ll start covering the basics and talk about Lookup Columns.
| Day: | 92 of 365, 273 left |
| Tools: | SharePoint |
| Description: | Reusable Metadata in SharePoint – Lookups |
In the previous couple of posts I covered adding columns to libraries and by now you should understand Single Line of Text and Choice columns. Now I have nothing against those – but horses for courses if you know what I mean. If we want people to use the same categories across sites / applications, then single lines of text or even choice columns is not the way to go. These are my rules when it comes to “reusable metadata”:
Single line of text – if you want to allow them to type whatever they want.
Choice column – if you’ll never use that dropdown on another application or site again.
Lookup – if you want to reuse it on the same site in different applications.
Site Columns – if you want to reuse it on the same site and sub sites in different applications.
Term Store – if you want to use it everywhere.
So seeing as we’ve covered Single Lines of Text and Choices, let’s look at Lookup columns.
So to create a lookup list – the separate list needs to exist first. Create a Custom List app, for example Departments. In this app, add a view departments. IMPORTANT: Create a new view which sorts your data A-Z and Displays at least a 100 items (Item limit in the view). Make this new view the default view. If not – your dropdown will look at a list which is not sorted and will only display the 30 items as per the Item Limit. Do not edit the default view – I consider that bad practice.
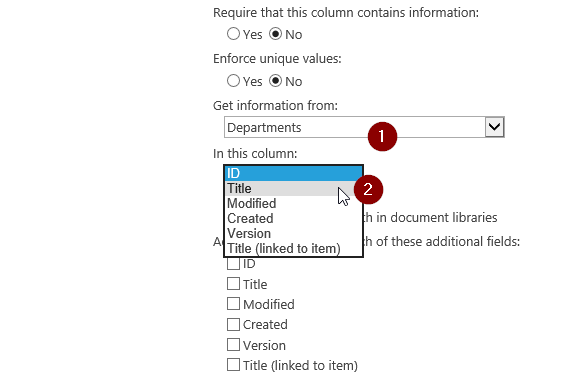
Now on your document library (for example), create a new column – choose lookup. As soon as you do, SharePoint will open all the lists on the CURRENT site to choose from. Pick the Department Custom List (1), then make sure you select the Title field (2), as SharePoint defaults to the ID (or it will show the numbers in the dropdown).

And that’s it!!! you can now do a Lookup to the same list all across your site – different applications. And you only have to maintain the list in one place.
I know. It’s amazing. I still get goose bumps! Tomorrow we’ll look at Site Columns.
Overview of my challenge: As an absolute lover of all things Microsoft, I’ve decided to undertake the challenge, of writing a blog every single day, for the next 365 days. Crazy, I know. And I’ll try my best, but if I cannot find something good to say about Office 365 and the Tools it includes for 365 days, I’m changing my profession. So let’s write this epic tale of “Around the Office in 365 Days”. My ode to Microsoft Office 365.
Keep in mind that these tips and tricks do not only apply to Office 365 – but where applicable, to the overall Microsoft Office Suite and SharePoint.

June 9, 2016 at 2:40 pm
There’s definately a lot to know about this topic. I like all the points
you made.
June 9, 2016 at 2:57 pm
Thanks Kristen, and believe me we all still learn new things every day, don’t we?