
#Office365Challenge – Content Types in SharePoint Part 3. My next couple of blogs will be about the Content Types in SharePoint. Today we’ll cover adding the newly created content type to your library.
| Day: | 130 of 365, 235 left |
| Tools: | SharePoint |
| Description: | Content Types in SharePoint – Add new Content Type to Library |
Related Blogs:
Around the Office in 365 Days: Day 128 – Content Types in SharePoint Part 1
Around the Office in 365 Days: Day 93 – Reusable Metadata in SharePoint – Site Columns
Around the Office in 365 Days: Day 129 – Content Types in SharePoint Part 2
So where are we with content types? 2 Days ago I referenced my crazy analogy of Kitchen Drawers (more for me to get my head around it than for the sake of anybody else).
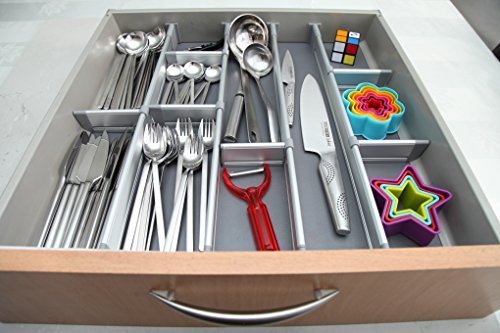
The analogy I’m going to use is a kitchen drawer. Every time you build kitchen drawers it automatically has compartments for the cutlery – knives, forks, spoons and teaspoons. If you want to build a building where every kitchen has a kitchen drawer with an extra compartment for the toothpicks – you’ll have to use a different “kitchen drawer compartment” – content type. You’ll use the original kitchen drawer compartment, copy it and then add the extra compartment. From now every time you build a kitchen drawer, you will use your newly customized kitchen drawer compartment, not the standard one – get it?
In SharePoint a Document Library would be the kitchen drawer, the cutlery the content, the compartment is the content type and the different sections are the metadata columns. If you need all your document libraries to have a column for Classification, then you will copy the default Document Content Type and add the Classification column.
Yesterday I took you through the steps of creating your own unique content type. And yes – I know it gets a bit technical – none of us do this every day – so just follow the steps and you’ll be ok.
Now that you’ve created your content type – I’ll show you how to add it to your library.
Add the new Content Type to your Library:
Go to the Library Settings > Advanced Settings. Change the setting “Allow Management of Content Types” to Yes. Click OK to save your changes.

On the Library Settings page, you will now see the Content Type associated with your library. You will also see the option to “Add from existing Content Types”. Click on this to start the process:

This is where you should thank me for telling you to create your own group for your unique Content Types – makes it so much easier to find now!! Select your group, and if you have multiple Content Types there, select the correct one and click on Add. Click OK to Save:

On your Library Settings page you’ll now see two Content Types, the default one and your new one:

Click on the default “Document” Content Type to open. Once it has opened, delete it. Click OK to confirm.

I’ve uploaded a document in the Library to test it and VOILA!! It worked! Keep in mind I’m already working on the updated version of the Document Libraries so it will look different, but in the Info Panel you can see the Content Type and the Metadata columns I added on that Content Type.

This is only the Tip of the Iceberg when it comes to Content Types, and this might seem like quite a process to add a new Content Type to a Library, when you could have just added the columns directly on the Library. Join me tomorrow where I’ll show you how to create a template library with this new Content Type – so all newly created Libraries will have this Content type added automatically.
Back tomorrow for some more Content Typing when we’ll create a library template with this new Content Type attached.
Overview of my challenge: As an absolute lover of all things Microsoft, I’ve decided to undertake the challenge, of writing a blog every single day, for the next 365 days. Crazy, I know. And I’ll try my best, but if I cannot find something good to say about Office 365 and the Tools it includes for 365 days, I’m changing my profession. So let’s write this epic tale of “Around the Office in 365 Days”. My ode to Microsoft Office 365.
Keep in mind that these tips and tricks do not only apply to Office 365 – but where applicable, to the overall Microsoft Office Suite and SharePoint.

7 Pingback