
My objective with this post is to open your eyes to what can be done on Wiki Pages (and don’t worry – no code was hurt in the process), AND what can be done in PowerPoint. Everyone who knows me well enough – knows that PowerPoint is my secret weapon and if I could cook in it – believe me – I would (at least then I could crop out the burnt parts ha ha).
I’m on a bit of a roll with Wiki Pages at the moment. When on contracts it seems my main mission is to work myself to death and I don’t get much to blogging. So I’ll be sharing quite a bit over the next two weeks, before going back to the salt mines.
So here goes…
In this post I’ll show you how to build a visual Organogram on a SharePoint Wiki Page. From this page you’ll be able to click on an employee and navigate to their profile page. I’ll be building this on O365 (SharePoint Online) – 2013 of course and the only other tools used are PowerPoint and Snipping Tool (found on all MS OS PC’s since your grandmother started using Vista).
As I’ll be referring to some previous blogs – see below list for more information:
The lighter side of Microsoft #11: Using Wiki Pages for Business Process Mapping
The lighter side of Microsoft #10: Mailto e-mail links
The lighter side of Microsoft #5: Be more creative with Microsoft Office
The lighter side of Microsoft #3: Banners & Click-able Images In SharePoint
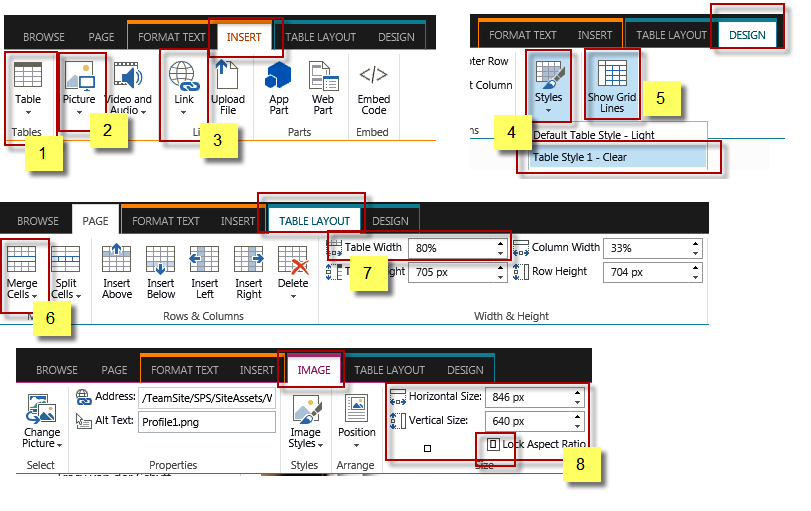
I’ll also be referencing the below Ribbons image throughout this blog:
Creating the Organogram Wiki Page:
In Wiki Pages for Business Process Mapping I explained how to use an Index page and create the new wiki pages from there. Using [[ ]] (square brackets) I add the new page on my index – [[Organogram]] – and saved the Index page. Once saved I can then click on the underlined name to create the new page.
Starting from a blank page I inserted a 3 (column) x 6 (row) table {Ribbons Image #1}. In PowerPoint I created the objects by inserting shapes and adding text to them. I then right-clicked and saved these shapes as images. On the SharePoint Wiki Page I inserted these images {Ribbons Image #2}. To get the alignment right – I’ve had to merge some of the columns {Ribbons Image #6} and centre the images. I also set the overall width of the table {Ribbons Image #7} to move the images closer to each other. I also changed the table’s style to not display the lines {Ribbons Image #4}. Save the page.
As these are images, you can use any fonts and don’t have to worry about web-safe fonts at all. To resize images – do not drag them – use the Image Tab Resizing – lock aspect ratio {Ribbons Image #8}.
Images below shows the final Organogram page – with the gridlines switched on in edit mode, and finally the saved image.


Creating the employee profile page:
Go back to your index page and add an entry for the new page you want to create. I’ve built my own profile page, so I added [[Tracy van der Schyff]]. Once the index page is saved, you can click on the underlined name to create the new page.
For this page I used PowerPoint. On the slide I inserted and arranged various images. Some of these are from PowerPoint Templates I downloaded from Presentermedia.com – fantastic site by the way. Keep up the good work guys!
After adding the text I used snipping tool to snip (copy) the different images. I did not want to insert one image as I have to add different hyperlinks to different images. You can only add one hyperlink per image (I surely miss the Image Maps I used in SharePoint 2010 Designer), and this is the only way to do it. See the image below that shows the full image in PowerPoint – and how I planned to cut it up.

Once all the individual images are saved, I can go back to the Profile Wiki Page and insert the images.
On the Tracy van der Schyff Wiki Page – I’ve inserted a 3 (column) x 12 (row) table {Ribbons Image #1} and inserted all the images. Again for alignment I merged some cells and set the overall table width {Ribbons Image #6 and #7} and then set the table style to clear {Ribbons Image #4}. Lastly I clicked on the individual social media images and inserted the hyperlinks to my social media pages. See my blog The lighter side of Microsoft #10: Mailto e-mail links. On the larger image I inserted a mailto link, this will enable users to click and send me an email. Save the page.
Keep in mind that these images are not responsive and will stay the same size regardless of the resolution. So design the image to have most of the clickable links towards the top left corner / half of the image, in case it cuts off. Find the average best fit size for the average resolution in your company and you’ll be ok.
Images below shows the final Profile page – with the gridlines switched on in edit mode, and finally the saved image.

<img

Adding the link on the Organogram page to the Profile page:
First copy the URL of your saved profile page. Navigate to the Organogram page and edit the page, click on the image you want to link the profile page to. I’ve used Tracy van der Schyff. Insert the link to the other page {Ribbons Image #4}. Save the page. The image on the Organogram that reads Tracy van der Schyff will now be clickable and will open the Profile page I created. Remember to add a link on the profile page back to the organogram page.

And that’s it for today. Go forth and be awesome!


November 7, 2015 at 12:38 pm
Howdy! Would you mind if Ishare your blog with my twitter group?
There’s a llot of folks that I think would really appreciate yur
content. Please lett me know. Thanks
November 7, 2015 at 12:47 pm
Of course you can! That’s why we blog – to share information and help other people.