
Most people don’t think they’re creative or that they have the ability AND the software to do so. In this post I’ll show you how to use Microsoft Picture Manager to compress, crop and resize images. Keep in mind that Microsoft Office 2013 does not include Microsoft Picture Manager anymore and this needs to be installed separately. See this blog on ASKVG on how to do this.
If your PC opens PNG / JPG / TIF files with Windows Photo Viewer, follow these steps to set Microsoft Picture Manager as the default for opening these type of files.
Set Microsoft Picture Manager as default program:
1. Right Click on an image in your pictures folder
2. Select Open With > Choose Default Program
3. Select Microsoft Picture Manager – if it doesn’t display under Recommended Programs, click on Browse to find it under Program Files > Microsoft Office > Office 14 > OIS
4. Click on OK

Use Microsoft Picture Manager to compress photos and images:
With mobile phones taking photos of up to 50 megapixels (and more I’m sure), the size of photos can be huge. Most photos are between 1mb and 10mb in size and can take up a lot of space. This method can be used to compress the size of images – which will take up less space and can be emailed for example. If you use “Documents” for compression it still keeps the quality of the image, but compresses to up to a fifth of the original size.
1. Open an image from your Pictures folder
2. Click on Thumbnail View to show all images in the folder and select all the photos you wish to compress
3. Click on Edit Pictures > Compress Pictures
NOTE: If you want to keep the original (large) images – make a copy of the images to a new folder before compressing them.

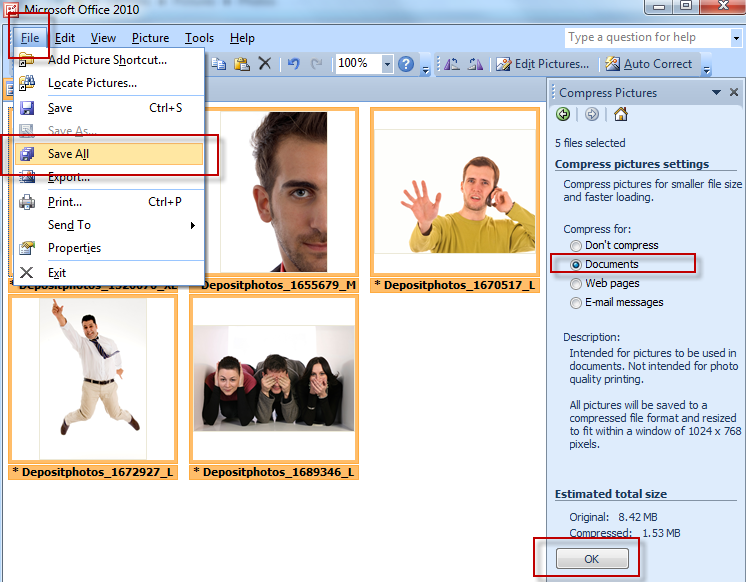
4. Choose Documents for Compressions (the other options are too small)
5. You’ll see in the example it’s compressed the images from 8.42mb to 1.53mb > Click on OK
6. Click on File > Save All
Use Microsoft Picture Manager to crop images:
Crop is to cut images smaller. This is available in all Microsoft Office Products as well under the Picture Tools > Format Tab > Crop.
1. Open an image from your Pictures folder
2. Click on Edit Pictures > Crop

3. The image will now be greyed out, hover over one of the corners, the cursor will change into a black picture frame corner
4. Drag the corner in to highlight the area you wish to keep (the rest will be cut away) – you will notice the new picture dimensions on the right
5. Click on OK, then Save the image.

As mentioned – you can crop images in the Microsoft Office Products as well:

Use Microsoft Picture Manager to resize images:
You might have a large photo that you would like to insert on a SharePoint Wiki Page. The photo’s current size is 524×624 pixels and you need to resize it to 262 x 312 pixels.
1. Open an image from your Pictures folder
2. Click on Edit Pictures > Resize
NOTE: To convert pixels to centimetres, simply divide the pixel by 37.8 = centimetre or use this converter.

3. I always use Percentage of original width and height (aspect ratio will be kept). As you click the down arrow on the percentage – you’ll see the new size appearing below the original size.
4. Once you’re happy with the new size, Click on OK, then Save the image.

Read more about being creative:
Empowering stuff for great people #1
The lighter side of Microsoft #5: Be more creative with Microsoft Office
I hope this can help you be more awesome than you already are…


Leave a Reply