
In this post we’ll be having a look at the promoted links (tiles) in SharePoint 2013. By default these appear next to each other in a row, and depending on your resolution, you might have to scroll to the right if there are more than 6 promoted links. Next I will show you how you can make changes to these and display them in for example ‘grids’ of 6 Wide x 4 High.
Please keep in mind that I’m not a ‘coder’ and this is my best attempt at making this as user friendly and easy for other ‘non-coders’ like me, out there…
Promoted Links app is a new feature introduced in SharePoint 2013. They store the links that will be shown as Tiles in the pages. Navigate to the team site; by default, a web part will be added that displays the tiles. The images and URL links can be changed (as shown below):

Step1: Create the Promoted Links Images:
1. Find an image you would like to use
2. I’ve used PowerPoint to plan the layout of the promoted links / image (Yes, yes, I’m sure there’s easier ways out there – but I LOVE PowerPoint)
3. In PowerPoint I grouped square shapes to form a grid that I place over the image. Keeping shift in I then drag the grid larger / smaller over the image to plan how many promoted links I want to use – for example 6 wide by 4 high.
4. Once I was happy with the layout, I used Snipping tool to snip the squares (inside the grid windows) which will become the Promoted Links images. I saved these as PM001, PM002 so that I would remember the sequence (as I’m using one large image and not 24 separate images)
5. NOTE: It’s important that these images are square.

Step 2: Create image library for the Promoted Links Images:
1. Site Settings > Add an app > Picture Library = Name: Promoted Links Images
2. Now upload the 24 Promoted Links Images in this Picture Library
Step 3: Create Promoted Links list:
1. Site Settings > Add an app > Promoted Links = Name: Promoted Links List
2. In this Promoted links list – add 24 lines which references the images you’ve uploaded (in the picture library – background image location) as well as the name & URL(website) for the Promoted Link
3. Use the “All Promoted Links View” to add lines
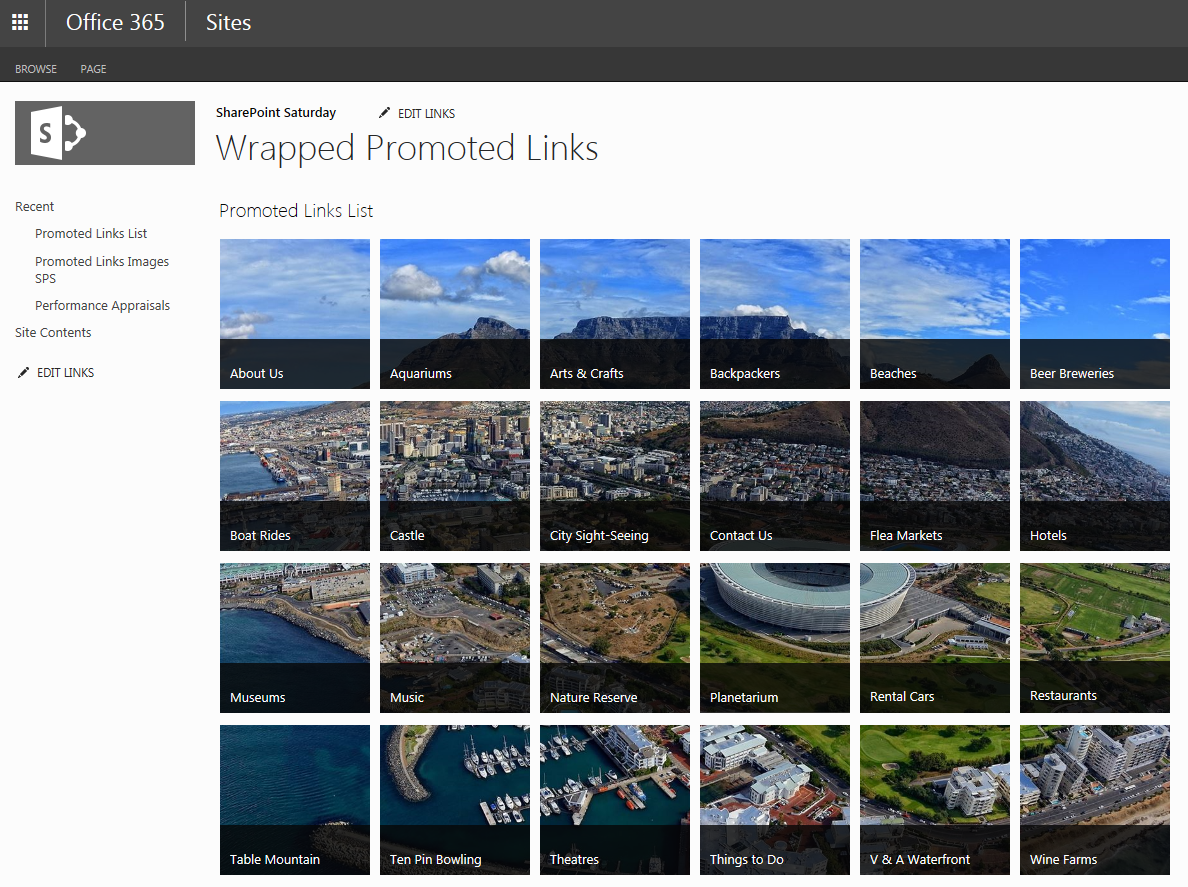
4. Remember the sequence needs to be the same sequence as your images – or the full image will be scrambled, see image below:

Step 4: Create a Wiki Page (or web part page):
1. Site Settings > Add a page > Name: Wrapped Promoted Links (Your own name)
2. In edit mode on this page, add the Promoted Links Web part
3. Insert Tab > Web Part > apps > Select the Promoted Links List you created in Step 3.
4. The Promoted Links will now be added to the page – but in a straight line (all 24 next to each other) as per the OTB SharePoint.
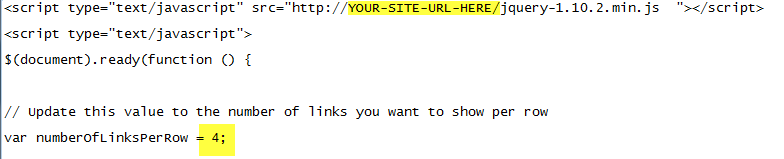
Step 5: Upload the latest jQuery version .JS file in your Site Assets (if necessary to reference in the code). I’ve used jquery-1.10.2.min. You can find the latest versions on this site:
Click here to use the file I’ve downloaded. Save this file and upload to your site for reference.
Step 6: Add the Script Editor Web Part (Snippet) on the page:
1. Insert Tab > Web Part > Media and content > Script Editor
2. Edit Web part > Edit the Snippet and Paste the following code (find here in text file) in the “Paste some script or embed code below” box.
3. Remember to (if necessary) set the Chrome State on your Script Editor to None – so that users won’t see it on the page.
4. Make the following changes to the code before saving. Change the URL to point to the jQuery file you uploaded in Step5
5. Change the Number of links to show in a line as per your design, I’ve changed it to 6.
6. Click on Insert the code and save the page
7. See image below to illustrate:
And there you go!!! Works beautifully when using “one solid image”.
Hope you enjoyed playing with promoted links. In the next post I’ll show you how to change the default size (150px) of the promoted links.
Thanks to Nick Williams for your post which got me started.

February 16, 2015 at 6:28 pm
Well done. Love it.
March 7, 2015 at 4:31 am
I’ve been exploring for a little for any
high-quality articles or blog posts on this sort of space .
Exploring in Yahoo I ultimately stumbled upon this website.
Studying this info So i’m satisfied to convey that I’ve an incredibly good uncanny feeling I discovered exactly what I needed.
I most certainly will make certain to do not forget this website and give it a look on a relentless basis.
March 23, 2018 at 6:03 pm
I know this is an old post … but I was wondering if you can recommend how to accomplish wrapping more than one promoted links list on the same page? I don’t know the code to insert to specify the name of each web part. Without that, it has mixed up my two sets of links. Thanks!
March 31, 2018 at 7:09 am
If I remember correctly it wraps all of them. If I come across a reference that specifies the web part header I’ll share with you.