
During September I presented at a couple of SharePoint Saturdays and was surprised at how many people (business and technical) didn’t know about ‘filtered email alerts’. See my presentations on SlideShare.
I’m pretty sure I stumbled across this accidentally years ago and it’s such a valuable tool, that it’s time to share it on my blog.
The example I’ll be referencing is an On-boarding solution. I’ll be using a Standard Out of the Box SharePoint Custom List with Alerts. No fancy workflows or forms, built on my Office 365 SharePoint site.
So when someone new starts in your company, they need various ‘things’ right? For example access to various platforms, pc, access card, parking etc. and the people involved in this process might be from different departments. So building a custom lists with all these fields are the easy part, setting up an alert to notify these people when something is required from them is also easy, but you don’t want to notify EVERYONE every time a new item is added? Peter is the guy who deals with allocating parking bays and because he always receives all the alerts (whether the person requires a parking bay OR NOT), he’s started slipping, because he misses the alerts only applicable to him.
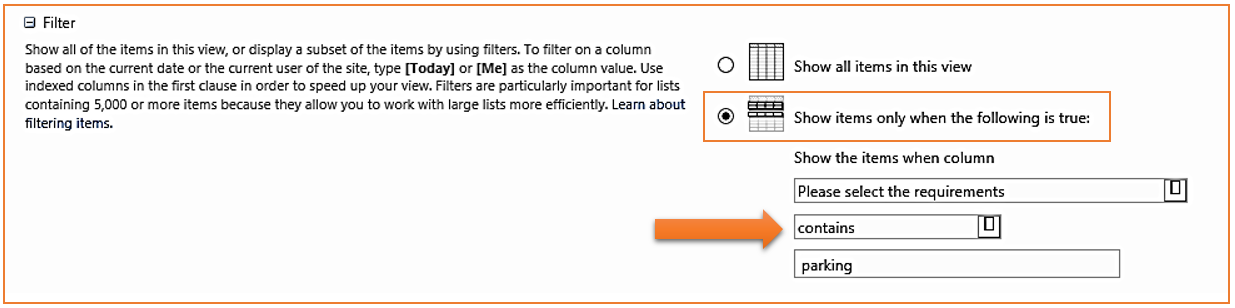
First step is then to write a filtered view.
1. Create the view, give it a descriptive name “Parking”
2. Setup the fields to show and order
3. Under filters, select “show Items only when the following is true”
4. Select the column where the word “parking” has been selected
5. IMPORTANT – if this column is a checkbox choice (allow multiple selections) it means you cannot choose when column “equals to” as the word “parking” will be part of a string. So you need to select “contains”. In other words, should the requirement be “Access Card,Desk + Chair,Notebook,Parking,Telephone”, the word “parking” will now form part of the string.
6. IMPORTANT – spelling has to be spot-on. If it doesn’t match – SharePoint will not find it. I normally copy and paste the text, just to make sure.
7. Save the view and add a test to make sure that any new requirement, which includes parking, now displays in this view.
Second step is to create the email alert for Peter.
1. Setup Alert. List Tab > Alert Me > Set alert on this list
2. Only send me alerts: When new items are created (don’t want to be notified of every modification)
3. Now this is the important bit, because you’ve created a filtered view, this view is now available to be selected for this alert. Send me an alert when: Someone changes an item that appears in the following view: “Parking”
4. Voila!! Peter will now only receive an email alert if something changes in ‘his’ view. If someone does not require parking, he will not get the notification.
Below are some images to guide you along the way:
Creating the filtered view, filter settings:
Creating the filtered email alert:
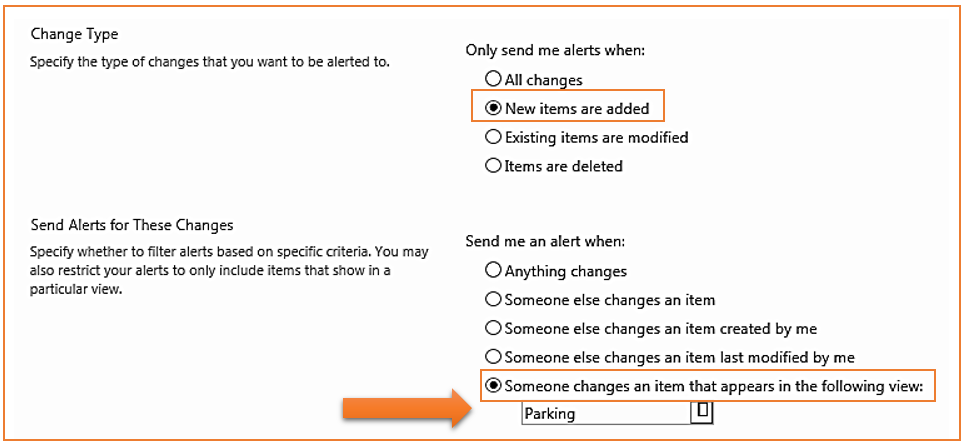
The filtered email alert:

Till next time cupcakes!


October 6, 2014 at 5:38 am
Thank you Tracy for sharing such an awesome solution!!!
You truely are “Amazing”
October 6, 2014 at 7:10 am
Such a pleasure Athena!!
October 7, 2014 at 1:34 pm
Hey Trace!
Always great hearing your emails! Keep them coming 🙂 I hope all is going well your side!
Kind regards,