
A while back I wrote a post “The lighter side of Microsoft #4: Folders vs Metadata in SharePoint” and I spoke about folders vs metadata. I feel quite strong about NOT using folders as people are lazy to categorize content, and tend to just drag folders across to SharePoint, making it an extremely expensive File Share.
However, there are times when using folders are actually quite useful. In this post I’ll explain how you can use folders to apply permissions to documents in a document library.
Scenario: Sharing management reports across departments, with different permissions applied to different documents. Now under normal circumstances we would build separate document libraries. I don’t support setting permissions on item level as it complicates your site and leads to micro management. In this case the libraries would be identical, with the same metadata, same views etc., merging these into one would make sense as you would have less maintenance and it would also be more convenient for the people who need to access more than one of the ‘libraries’.
First thing to do is create the folders which will represent the audience groups:
Click on Files Tab > New Folder. Give the folder a descriptive name.

Secondly add the metadata columns necessary for the files (in this example I used Document Type and Share)
Thirdly you need to setup the permissions on the folder levels (NOT on the library level): Click on the ‘Open Menu’ (…) next to the folder, click on the second ‘Open Menu’ (…) then click on Shared with and then on Advanced.

Now you can click on ‘Stop inheriting permissions’, then delete and add the unique permissions:

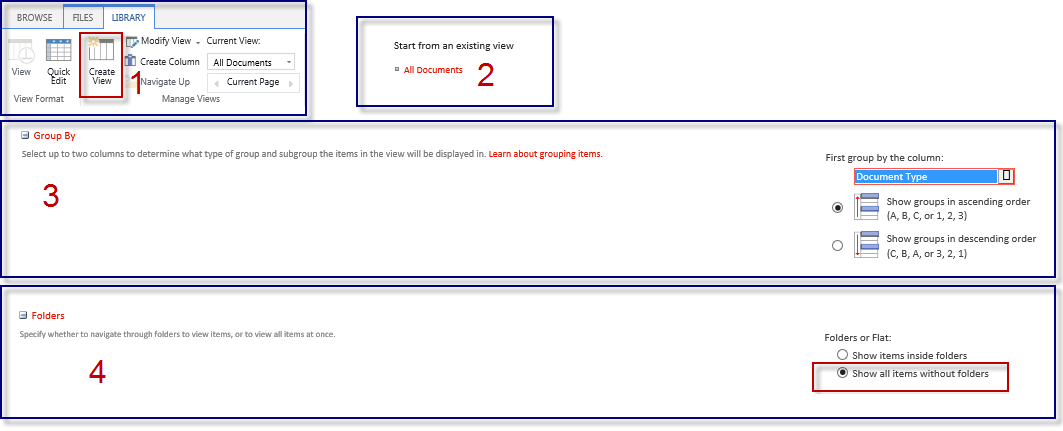
Fourth step is to create a view where the folders are hidden. In this view you will see all the documents you have access to, regardless of which folders they were uploaded in. So if I need to access three of the folders, I only have to navigate to the one library and see all my documents in one place.
Go to the Library Tab > Create View. Copy the view from All items (never EVER edit the default view, create a new one and copy it from the default view. If your new view ‘breaks’ you still have the default view to go back to, with which you can open the list/library). Under Group By, set it to “group by Document Type”, the Folder setting should be set to “Show all items without folders”.
You are now ready to upload documents to this library. Always ensure that you are uploading the documents to the correct folder, or the permissions will not be applied correctly.

Even though metadata cannot be applied to folders, you will still add the properties to the documents within the folder.
You will see that the All documents view displays the list view + the folders. The new Reports view displays the documents without the folders, grouped by the metadata.


Hope you can use this. Till next time.


5 Pingback