
If you’re new to SharePoint, one of the first terms you’ll come across is Metadata. In this blog I’ll give you an overview and show you how to use metadata in a document library to summarize and “report” on data. I’ve done this on SharePoint 2013 / Office 365.
Metadata: “Metadata describes other data. It provides information about a certain item’s content. For example, an image may include metadata that describes how large the picture is, the colour depth, the image resolution, when the image was created, and other data.”
Taxonomy is another word you’ll come across: “science of classification according to a pre-determined system”
For more information see “87 Terms Every Non-Technical SharePoint Professional Should Know” by Richard Harbridge.
We’ve been working with metadata for many years – we just didn’t know it. On your PC, go to your Windows Explorer > Documents Library. (In the Details view) right-click on the column header and you’ll see that you can actually pick more properties to display from the list.
The default meta data displayed:
Document Library: Name > Date Modified > Type > Size etc.
Music Library: Name > Contributing Artist > Album > # > Title etc.
Picture Library: Name > Date > Tags > Size > Rating > Dimensions etc.
Video Library: Name > Date > Type > Size > Length etc.
So each type of library on your pc has document properties related to that type of content. SharePoint has the same default properties related to content. The difference in SharePoint is that you can add your own unique properties.

In this example, we’ll build a library for Performance appraisals. As we won’t be using folders to ‘separate’ the content, we’ll define some fields to use for identification, views and yes – “reporting”:
Build the library:
Build a document library – call it Performance appraisals.
To add columns (metadata), go to Library Settings > Create Column. See the image below for the column types available in SharePoint.

Create the following columns: Employee Name (Person or Group), Department (Choice / Managed Metadata), Appraisal Date (Date and time), Year (Choice) – these will be used for identification and views. Now add Score (number) which we’ll be using for ‘reporting’ and alerts.
Creating Views:
I’ve uploaded some documents and created views following these steps:
1. Library Tab > Create View
2. Start from existing view > All documents
3. Name: Give the view a name
4. Audience: Set as Public View
5. Columns: Choose the columns you would like to display in this view
6. Sort: This will indicate the sort order of the files (for dates I always choose descending to display the latest date at the top)
7. Filter: Allows you to only display certain data – no filters set now
8. Tabular View: Allow individual item checkboxes
9. Group by: Here you can set the groupings, for example first group by Department then group by Year
10. Totals: I’ve set the Score column to Average
11. Style: Left the style on Default
12. Folders: Used to “hide” folders from the view, leave as Show items inside folders
13. Item limit: Set the limit of items to display here
14. Mobile: Leave on default
15. Save the view
Example of views:
Grouped by Department > Grouped by Year (note I’ve added the Average on the Score column)

Grouped by Department > Grouped by Employee

Grouped by Year > Grouped by Department

To create a filtered view, you will follow the steps above – on step 7 you will setup the filter. IMPORTANT = the filter must match the text in that column EXACTLY, and don’t forget to tick the radio button for “Show items only…” See image below to illustrate:

The filtered view I’ve created is for Marketing. I then grouped the view by Year and sorted by Employee Name:

Now for the “reporting” bit….
Creating Filtered Views:
The Marketing Director does not want to browse through all the appraisals. He only wants to know if someone in Marketing receives a score of either lower than 2, or higher than 4. Of course you can do this with some fancy workflows – but I’m going to do this with filtered views & alerts.
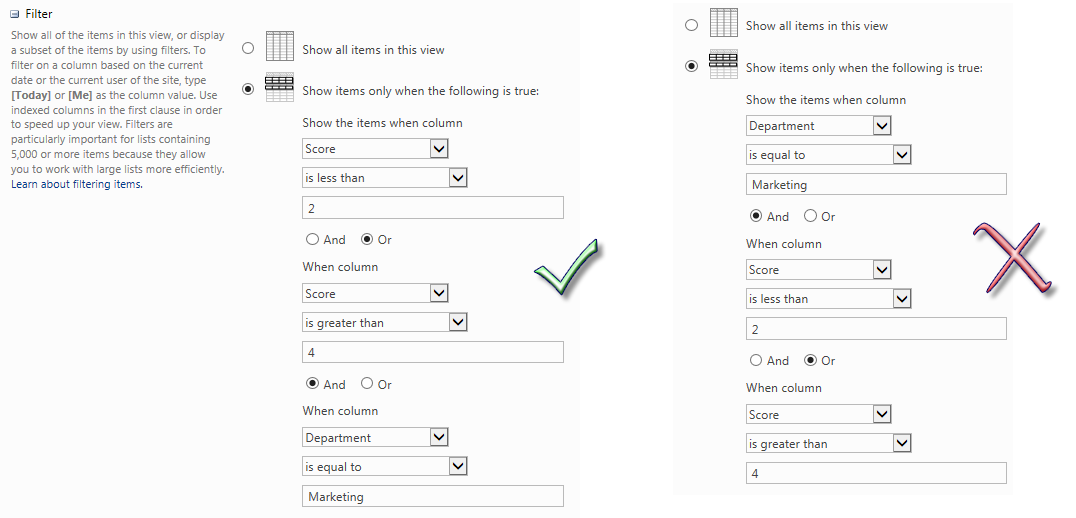
You have to create the filtered view. Following the steps above, create a view that only shows Marketing department documents that have a score above 4 or below 2.
Most of us start the filter with Department = Marketing AND Score larger than 4 OR less than 2 (Image on the right). This however does not work because the conditions in operators are grouped from the beginning. Start with the possible conditions and end with the definite condition (Image on left).
Once this view is created – we can now create an alert on this view to be sent to the Marketing Director.
Library Tab > Alert Me > Set alert on this library. Set the Change type to “New Items are Added” and Send Alerts for these Changes to “Someone changes an item that appears in this view: Marketing Below 2, Above 4”. See image below:

As soon as someone uploads a new document that meets the above criteria, the Marketing Director will receive an automatic email (alert) with the details. Voila!! See the alert email received below:


December 26, 2019 at 5:53 am
It’s amazing to visit this site and reading the views of all colleagues about this piece of writing, while I am also zealous of getting experience.|
http://bimarabia.com/elgg/blog/view/417217/nload