
#Office365Challenge My blog today will give you an overview of Wiki Pages in SharePoint. How to create them and start adding content.
| Day: | 181 of 365, 184 left |
| Tools: | SharePoint |
| Description: | SharePoint Wiki Pages |
Related Blogs:
The lighter side of Microsoft #21: SharePoint Wiki Pages with clickable Metro tiles
The lighter side of Microsoft #13: Change the background colour or image on Wiki Pages
The lighter side of Microsoft #12: Wiki Pages for Organograms and Profile Pages
The lighter side of Microsoft #11: Using Wiki Pages for Business Process Mapping
The lighter side of Microsoft #18: Image maps in SharePoint 2013
Terminology:
The word “wiki” means “quick” in Hawaiian language. A wiki is a site that is designed for groups of people to quickly capture and share ideas by creating simple pages and linking them together. Your organization can use a wiki for a variety of uses. On a large scale, you can share large volumes of information in an Enterprise wiki. Or on a smaller scale, you can use a team site as a wiki to gather and share ideas quickly about a project. Microsoft
A wiki is a website that provides collaborative modification of its content and structure directly from the web browser. In a typical wiki, text is written using a simplified mark-up language (known as “wiki mark-up”), and often edited with the help of a rich-text editor. The encyclopedia project Wikipedia is by far the most popular wiki-based website. Wikipedia
As mentioned before – these are by far my favourite! Wiki pages are such a cool, creative way to allow end users to create some really beautiful pages. Imagine a PowerPoint presentation where some of the shapes etc. on the pages are hyperlinked to go to the other pages. Doing this as Wiki Pages is a step up and allows for that navigation between pages to be in the web. This means that any user already creating content in Word / PowerPoint can create them as Web pages – and it’s easy!!
How to create a Wiki Page:
- As a new page in your Site Pages Library:
Now there are different ways of doing this. You can go to your Site Pages Library, click on Files Tab (1), New Document (2), then select Wiki Page (3):
 Or you can create a Wiki Page library app specifically for your pages. I prefer doing this as all my Wiki Pages will then be in one location (away from the Site Pages).
- As a new Wiki Page Library App:
Go to Site Contents and click in Add an App. Search for Wiki. Click on the icon to create a new Wiki Page Library, I’ve named mine “Wiki” as I’ll be using it for all my Wiki Pages. Once created, find it in your Site Contents and open the App:
A Wiki Page Library by default opens on its own Home page, click on Edit in the top right corner to edit the page:
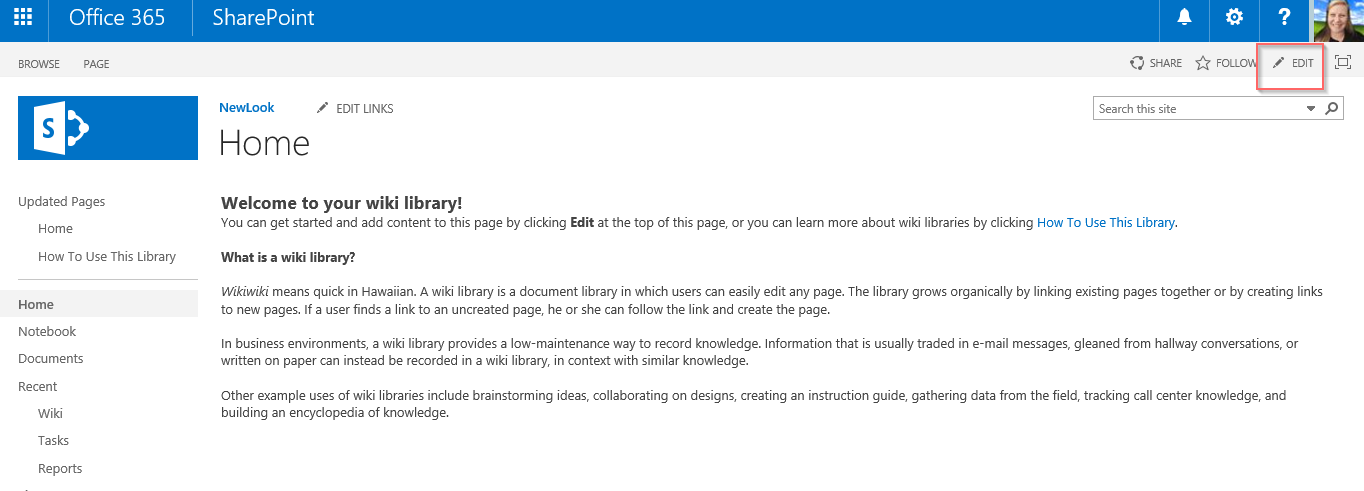
I’ve selected all the text and deleted it.
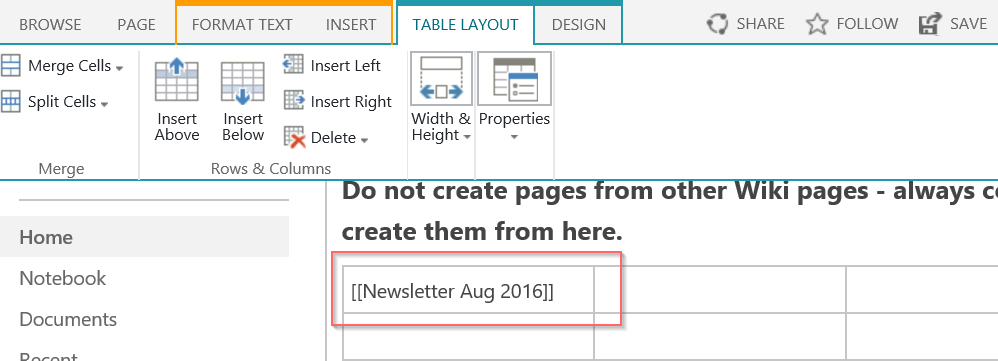
Now this is something I always do, I never use this page to add content, but rather us it as my Index page for all my Wikis. See the note I’ve added at the top to remind the users. You can create a new Wiki Page from any other existing Wiki Page – I also don’t do that. I always come back to this Index page and create it from here. It’s similar to giving a book a good Index page – even though only for Administrative purposes. End users will not navigate here – they will navigate directly to the specific Wiki Page they want to read (however which way you’ve shared that).

Once I’ve added the text and table – I can add a new page name to create a new page. This is very easy to do, Type the new page name in square brackets as seen below and save the page:
When your Index page is not in edit mode anymore – you’ll be able to click on the new Wiki Page name to create it:
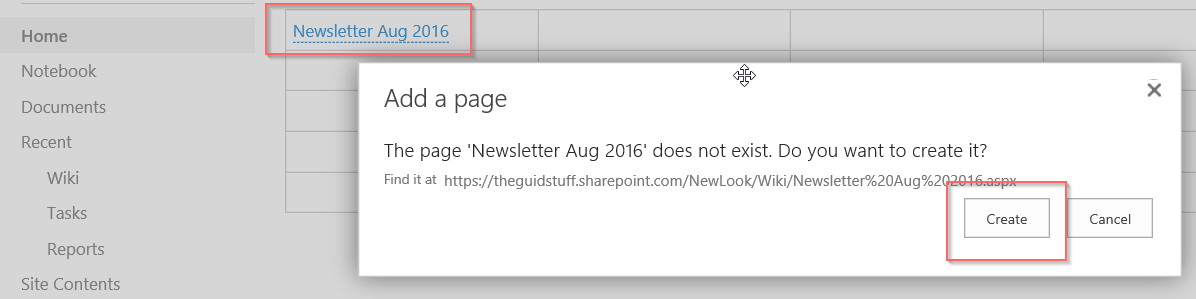
And voila!! Your page is created. You can now add text and formatting to the page. As this will be a Newsletter, the first thing I do is add layout to the page. There is nothing as boring as reading text which are not formulated into columns (think Newspaper). Under the Format Text Tab, you’ll find Text Layout on the right. In this example I’ll choose 3 columns:

I then proceed to add text and images:

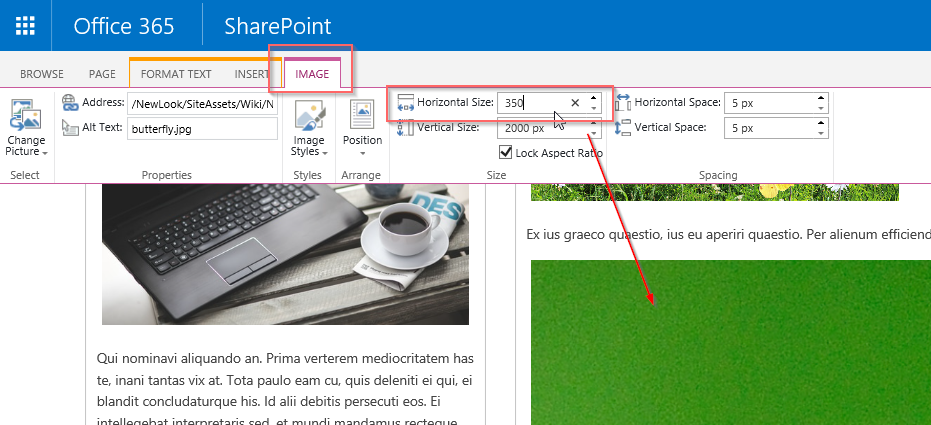
To adjust the size of images, do not try to drag them smaller – I’ve chosen 350px width for all my images to get a clean ‘article’ look. Select the picture and under the Image Tab, you’ll find Horizontal size which you can adjust:
Once you are done with your changes, Save the page:

This is my end result. Take note how placement of images and making all the images the same size, has a great impact on how well the article presents. Once the page is saved, you can copy the URL of the page and share on an announcement, email or even link on your landing page:

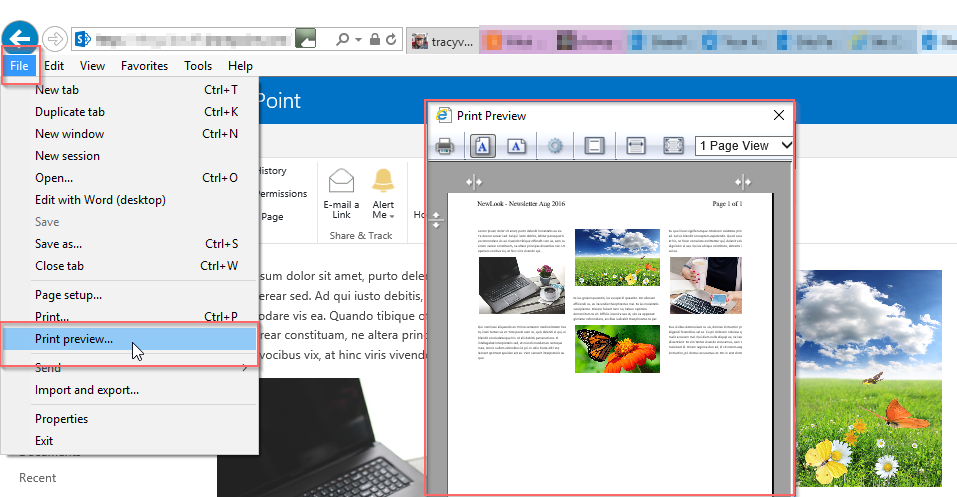
Wiki Pages print really well straight from the browser, if your menu is not showing click Alt. then click on File > Print Preview. You might have to adjust your page a bit for print area best fit:
Tomorrow I’ll be looking at adding hyperlinks and shapes on Wiki Pages.
Overview of my challenge: As an absolute lover of all things Microsoft, I’ve decided to undertake the challenge, of writing a blog every single day, for the next 365 days. Crazy, I know. And I’ll try my best, but if I cannot find something good to say about Office 365 and the Tools it includes for 365 days, I’m changing my profession. So let’s write this epic tale of “Around the Office in 365 Days”. My ode to Microsoft Office 365.
Keep in mind that these tips and tricks do not only apply to Office 365 – but where applicable, to the overall Microsoft Office Suite and SharePoint.

July 25, 2017 at 2:16 pm
I stumbled across your blog when looking for advice on how to print all wiki pages in a wiki library. I was already aware of your tip on printing via the browser so didn’t find a new solution but what I did come across is your wonderful blog! What a fantastic idea for Around the Office in 365 Days! I have bookmarked your blog and will be sure to read through and keep up-to-date. I am also considering a blog for my activities in knowledge management and have been inspired by your efforts. Thanks!
July 25, 2017 at 2:23 pm
That’s awesome news Janine. Started a new Microsoft 365 challenge today – so there’s lots more to come!
November 20, 2018 at 10:31 am
Thanks for getting me started. It really helped!
November 21, 2018 at 8:43 pm
You’re so welcome!