
#Office365Challenge Ready to have some fun with Wiki Pages? Yesterday we looked at creating and adding text and images. Let’s look at inserting shapes and adding hyperlinks to them today.
| Day: | 182 of 365, 183 left |
| Tools: | SharePoint, PowerPoint |
| Description: | Shapes with Hyperlinks on Wiki Pages |
Related Blogs:
Around the Office in 365 Days: Day 181 SharePoint Wiki Pages
The lighter side of Microsoft #21: SharePoint Wiki Pages with clickable Metro tiles
The lighter side of Microsoft #13: Change the background colour or image on Wiki Pages
The lighter side of Microsoft #12: Wiki Pages for Organograms and Profile Pages
The lighter side of Microsoft #11: Using Wiki Pages for Business Process Mapping
The lighter side of Microsoft #18: Image maps in SharePoint 2013
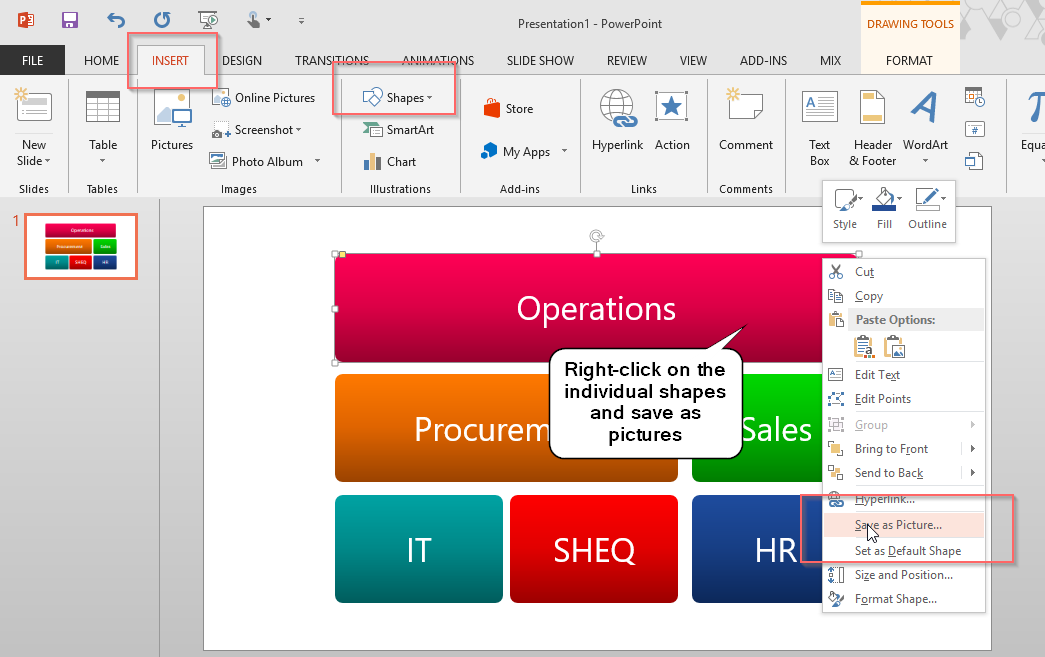
In today’s example, I’ll be building some process pages. Firstly I’ve created the shapes I want to use in PowerPoint.
Insert the shapes, changes colours and add text, then right-click on the shapes and save them as individual pictures:
In SharePoint, I’ve created pages for the main Process page as well as the Departments below it. I did this by putting the Index page of my Wiki library in edit mode, then added all the page names in double square brackets, see below:

Once the Index page is saved, you can click on the hyperlinks to create the pages (see Blog Day 181 for more detail on creating pages):

I will edit the main Processes page first. I’ve added a 3×3 column table and then merged some of the cells to represent the image I’d like to build:

On this table I will now insert the shapes as per the planning in PowerPoint. (when you’re done, you need to set the width and the height of the table to remove the spaces between the shapes):
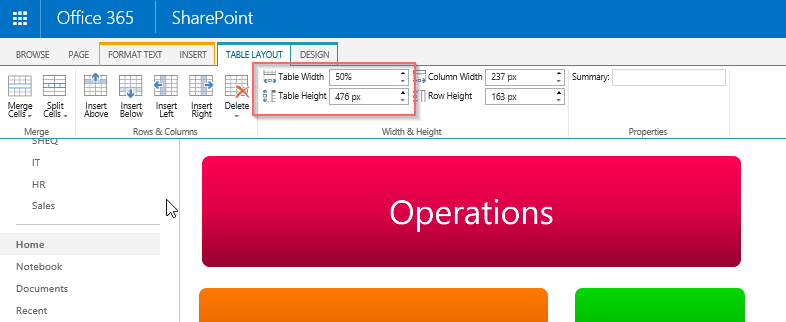
I’ve also resized the images (PowerPoint always creates the images rather large). Be careful to reduce them all by exactly the same %. All I did was take each shape and change the width to exactly half. As Lock Aspect Ratio is ticked, I only had to set the Horizontal Size of all the images, the Vertical will reset according to the Aspect Ratio.

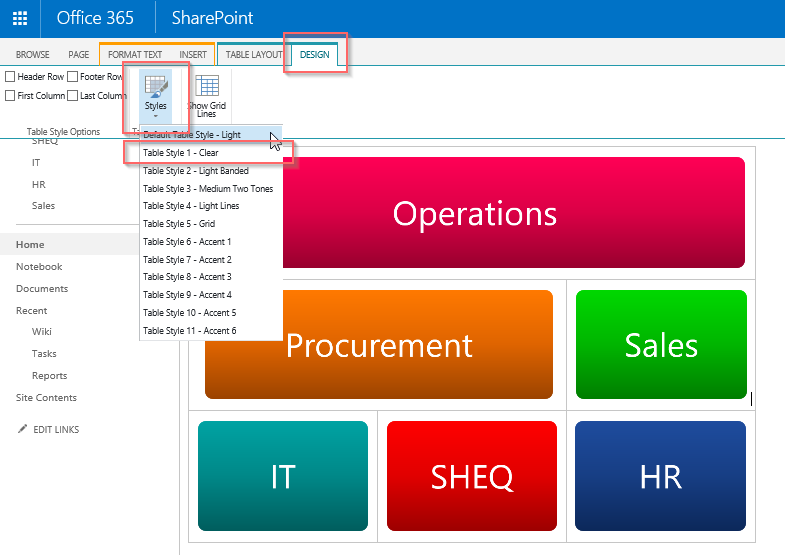
When all the images are uploaded you can remove the table lines (set the style to clear):
Here’s a tip – if you drew these shapes freehand in PowerPoint – I bet you they won’t align now – it’s very difficult to guess the width of blocks that needs to align with others when there is spaces in between them involved. So what I did was insert a SmartArt in PowerPoint that looks like this – then drew the individual shapes over it to get my sizes right. You cannot save the individual shapes in SmartArt – or I would have just used that.

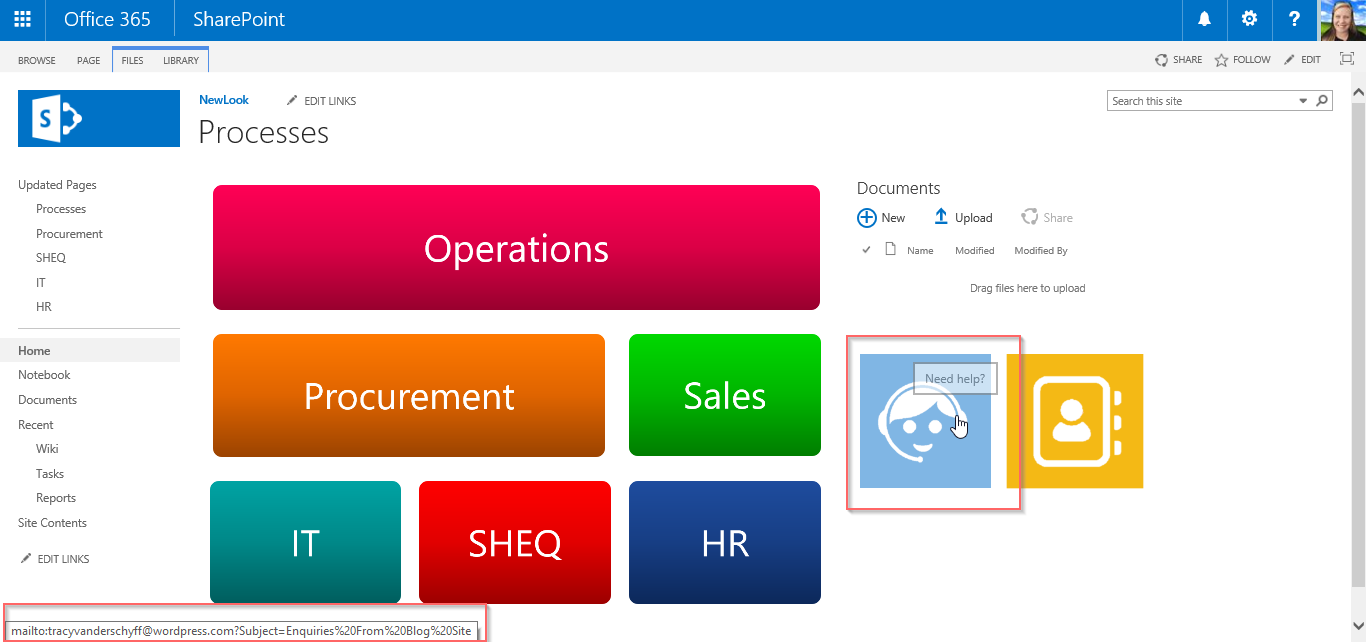
So this is what the page looks like now, I’ve also changed the zones (text layout – two columns) and added my document library web part on the right. We’ll get to web parts in detail over the next couple of days.
Pretty cool right? Using the table to insert the shapes – then fixing the table width and height keeps it in place on high and low resolutions:

Now lets add hyperlinks to the shapes. It will be easier to open a duplicate tab on which you can get all the hyperlinks you need. I then dragged the duplicate tab out to put the windows next to each other. See below:
When the above page is in edit mode, select the shape where you would like to insert the hyperlink, for example Operations. Click on Insert Tab > Link > From Address. On the other tab, navigate to the Home Page (Index) of your Wiki Library. From here you can copy and paste all the links you need. Right click on the Operations Page Link and select Copy Shortcut. You can now paste that link in the Insert Hyperlink Address bar on the left. Do this for all the shapes. Save the page and test the links.
(Yes, you can click Insert Link > From SharePoint and navigate to the pages to get the links, but in my experience that just takes too long).

Now when users click on the shapes, it navigates to the Wiki page you’ve built for that process. If I hover over the shape it shows the URL it’s link to in the bottom of my browser:

Now that the links are added, you can go to the Links Tab to configure the link. Create a Description and stipulate whether it must open in a new window:

This is what the description (hover over text) will look like:

Note: You can add hyperlinks on Shapes, buttons, Photos and Text. These hyperlinks can be to pages in your current sites or to websites external to your company.
I’ve also added two extra buttons (I created them in PowerPoint), the Helpdesk Button I created a Mailto URL on and the Contacts Button I linked to a Contacts Listing. Read my blog on creating Mailto URL’s here.
Now that was fun!!!
Tomorrow I’ll show you how to build old fashioned bread-crumbs on your pages and reference / link different Wiki Pages to each other.
Overview of my challenge: As an absolute lover of all things Microsoft, I’ve decided to undertake the challenge, of writing a blog every single day, for the next 365 days. Crazy, I know. And I’ll try my best, but if I cannot find something good to say about Office 365 and the Tools it includes for 365 days, I’m changing my profession. So let’s write this epic tale of “Around the Office in 365 Days”. My ode to Microsoft Office 365.
Keep in mind that these tips and tricks do not only apply to Office 365 – but where applicable, to the overall Microsoft Office Suite and SharePoint.

1 Pingback